
Best Electric Dirt Bike Accessories: Essential Upgrades Every Rider Should Have
Best Electric Dirt Bike Accessories Buying an electric dirt bike is only the beginning of the riding experience. Whether you

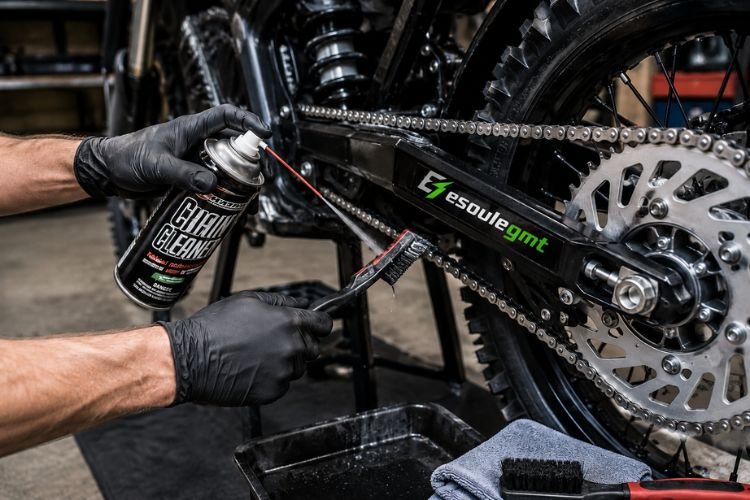
A clean chain does more than make your electric dirt bike look better—it helps the drivetrain run smoothly, reduces unnecessary wear, and extends the life of both the chain and sprockets.
Unlike a traditional gas dirt bike, an electric dirt bike delivers instant torque every time you twist the throttle. That immediate power puts consistent stress on the drivetrain, making regular chain cleaning one of the simplest and most important maintenance tasks.
The good news is that cleaning your chain doesn’t require expensive tools or advanced mechanical skills. With the right supplies and a few minutes after dirty rides, you can keep the drivetrain working efficiently and help prevent premature wear.
Whether you’ve just finished riding through mud, sand, dusty trails, or wet conditions, this guide walks you through the safest and most effective way to clean an electric dirt bike chain.
To clean an electric dirt bike chain, place the bike on a stand, inspect the chain, apply a motorcycle-safe chain cleaner or degreaser, scrub away dirt with a soft chain brush, wipe the chain dry with a clean microfiber cloth, then apply an appropriate chain lubricant while slowly rotating the rear wheel. Finish by wiping away excess lubricant to prevent dirt from sticking during your next ride.
For the best results:
There’s no single maintenance schedule that works for every rider.
How often you should clean the chain depends largely on where and how you ride.
A bike used on dry hard-packed trails stays much cleaner than one ridden through deep mud or wet sand.
Use the table below as a practical guideline.
| Riding Condition | Recommended Cleaning Interval |
|---|---|
| Dry trails or gravel roads | Every 150–200 miles or when visibly dirty |
| Dusty riding conditions | Clean after each ride or when heavy dust builds up |
| Muddy trails | Clean immediately after riding |
| Sand | Clean after every ride |
| Rain or wet conditions | Dry and clean the chain before storage |
Instead of relying only on mileage, make it a habit to inspect the chain after every ride.
If you notice thick dirt, sand, mud, or old lubricant collecting around the rollers, it’s time for a proper cleaning.
You don’t need a professional workshop to clean your chain properly.
Most riders already own many of the necessary supplies.
Avoid using steel brushes or abrasive cleaning pads, as they can damage the chain’s protective surfaces.
If your chain uses O-rings or X-rings, always choose cleaning products that are compatible with sealed chains and follow the manufacturer’s recommendations.
Cleaning the chain properly takes only a few minutes, but following the correct sequence helps remove grime without causing unnecessary wear.
Position the bike on a maintenance stand so the rear wheel can rotate freely.
This makes it easier to clean every section of the chain evenly while keeping both hands free.
If you don’t have a stand, carefully move the bike forward a short distance as you work through each section of the chain.
Before reaching for the cleaner, take a close look at the chain.
Check for:
Cleaning provides an excellent opportunity to catch problems before they become expensive repairs.
Spray the cleaner evenly along the inside and outside of the chain while slowly rotating the rear wheel.
Allow the cleaner to soak for several minutes according to the product instructions.
This helps loosen old lubricant, dirt, and abrasive grit without excessive scrubbing.
Avoid spraying directly onto brake discs, brake pads, or tires.
Using a soft chain brush, clean all sides of the chain.
Pay extra attention to the rollers and side plates where dirt tends to collect.
Work around the entire chain until the old grease and debris have been removed.
For stubborn buildup, apply a second light coat of cleaner rather than using excessive force.
Once the chain is clean, wipe away the remaining cleaner and loosened dirt using a clean microfiber cloth.
Rotate the rear wheel slowly to ensure every section of the chain is completely dry.
Moisture left behind can dilute fresh lubricant and may contribute to corrosion over time.
Many riders clean the chain only when it’s covered in mud.
In reality, fine dust and sand can be even more damaging.
Tiny abrasive particles work their way between the rollers and sprockets, gradually accelerating wear long before the chain appears visibly dirty.
A quick inspection after every ride often prevents the need for deep cleaning later and helps extend the service life of the entire drivetrain.
Cleaning removes dirt and old lubricant, but it also leaves the chain unprotected.
Applying fresh chain lubricant is the final step that helps reduce friction, minimize wear, and protect the chain from moisture and corrosion.
For most electric dirt bikes, it’s best to use a motorcycle chain lubricant that’s compatible with your chain type and recommended by the manufacturer.
To lubricate the chain:
A light, even coating is usually more effective than applying excessive lubricant.
This is one of the most commonly overlooked steps.
More lubricant does not mean better protection.
Excess lubricant attracts dust, sand, and trail debris, creating an abrasive paste that can actually increase drivetrain wear.
After allowing the lubricant to settle, gently wipe the outside of the chain with a clean microfiber cloth.
The lubricant you want is primarily inside the chain, not coating the outside.
In most cases, yes.
Whenever a chain has been thoroughly cleaned with a degreaser, applying fresh lubricant is recommended because the cleaning process removes much of the protective film that helps reduce friction.
A good rule of thumb is:
| Maintenance Task | Lubricate Afterwards? |
|---|---|
| Deep chain cleaning | ✔ Yes |
| Riding through heavy rain | ✔ Yes |
| Muddy ride with full wash | ✔ Yes |
| Light dust wiped off only | Usually not necessary unless the chain feels dry |
If the chain appears dry, sounds noisy, or no longer has a visible protective film, it’s usually time to lubricate it.
Not all lubricants perform equally in every environment.
Selecting the right product for your riding conditions can help keep the chain cleaner while reducing wear.
| Riding Condition | Recommended Lubricant Type |
|---|---|
| Dry, dusty trails | Dry chain lubricant |
| Mud and wet conditions | Wet chain lubricant |
| Mixed trail riding | All-purpose motorcycle chain lube |
| Long-distance adventure riding | Long-lasting synthetic chain lubricant |
Always follow the lubricant manufacturer’s instructions and ensure the product is suitable for your chain type.
This is one of the most common questions riders ask.
The answer depends on which WD-40 product you’re referring to.
The original multi-use WD-40 formula is widely used to help loosen grime, displace moisture, or clean light surface contamination. However, it is not generally intended to serve as a long-term chain lubricant for motorcycle-style chains.
After cleaning, most manufacturers recommend applying a dedicated chain lubricant designed for motorcycle or dirt bike chains.
If you’re unsure which products are appropriate for your specific chain, consult your owner’s manual or the chain manufacturer’s recommendations.
Not every ride leaves your chain in the same condition.
Adjusting your cleaning routine based on the terrain helps extend drivetrain life while avoiding unnecessary maintenance.
Mud often traps moisture, grit, and small stones around the rollers.
As soon as practical:
Leaving dried mud on the chain can accelerate wear.
Sand is highly abrasive.
Even if the chain doesn’t look particularly dirty, fine sand particles can remain trapped between the rollers.
Carefully remove the sand before applying fresh lubricant.
Avoid adding lubricant to a sandy chain without cleaning it first, as this can create an abrasive mixture.
Dust builds up gradually and often mixes with old lubricant.
If you ride in dry conditions regularly:
Water washes away lubricant and increases the risk of corrosion.
After wet rides:
Never store the bike with a wet, unprotected chain.
Many chain problems aren’t caused by difficult riding—they’re caused by poor maintenance habits.
Avoid these common mistakes.
Applying excessive lubricant attracts dirt and accelerates wear.
A thin, even coating is usually all that’s required.
A clean chain without lubrication is left vulnerable to friction and corrosion.
Always restore the protective film after a thorough cleaning.
Wire brushes, aggressive abrasives, or harsh solvents can damage certain chain components or seals.
Use products recommended for motorcycle chains whenever possible.
Cleaning is also the perfect opportunity to inspect chain slack.
A chain that’s too loose or too tight can wear faster and affect power delivery.
Always check chain adjustment according to the manufacturer’s specifications.
A chain doesn’t have to look heavily soiled before it needs attention.
Fine dust and grit cause gradual wear that isn’t always visible.
Regular inspections help prevent unnecessary drivetrain damage.
Instead of thinking of chain cleaning as a separate maintenance task, combine it with your regular post-ride inspection.
After cleaning the bike, spend an extra few minutes checking:
Performing these checks together creates a simple maintenance routine that helps identify small issues before they become costly repairs.
Cleaning can restore a dirty chain, but it can’t repair a worn one.
As you clean your electric dirt bike chain, take a few extra minutes to inspect it for signs of wear. Catching problems early can help prevent premature sprocket wear and reduce the risk of drivetrain issues during a ride.
Look for the following warning signs:
If several of these issues are present, replacing the chain—and, in many cases, the matching sprockets—is usually the best long-term solution.
A quick inspection after cleaning helps confirm that the drivetrain is ready for your next ride.
| Inspection Item | What to Look For |
|---|---|
| Chain Cleanliness | No mud, sand, or old grease remaining |
| Lubrication | Thin, even coating with excess wiped away |
| Chain Slack | Within the manufacturer’s recommended range |
| Rust | No heavy corrosion or seized links |
| Master Link | Properly installed and secure |
| Sprockets | Teeth show no excessive hooking or damage |
Making this inspection part of your routine only takes a few minutes and can help prevent avoidable repairs.
Even with regular maintenance, chain issues can occasionally develop.
Here’s how to identify some of the most common problems.
Possible causes include:
Clean the chain, apply fresh lubricant, and verify the chain slack according to your owner’s manual.
Light surface rust can often be removed during cleaning.
If corrosion is severe or the chain has seized links, replacement is usually the safer option.
Prevent future rust by drying the chain after wet rides and applying fresh lubricant before storage.
If the chain repeatedly loses tension, inspect:
A stretched chain may no longer maintain proper adjustment and could require replacement.
Stiff links are often caused by:
Thorough cleaning followed by proper lubrication may restore movement.
If individual links remain seized after cleaning, replacing the chain is recommended.
Regular maintenance doesn’t have to be complicated.
These small habits can significantly increase the lifespan of your drivetrain.
Consistent care is usually far more effective than occasional deep cleaning.
For most riders, inspect the chain after every ride and clean it whenever dirt, mud, or old lubricant begins to accumulate. Muddy and sandy rides typically require immediate cleaning.
Yes. A thorough cleaning removes much of the existing lubricant, so applying a fresh coat afterward helps reduce friction and protect against corrosion.
High-pressure water can force dirt and moisture into sensitive components and may shorten the life of sealed chains or nearby bearings.
A gentle rinse followed by proper cleaning is generally the safer approach.
A motorcycle-safe chain cleaner or chain degreaser designed for your chain type is typically the best choice.
Always follow the recommendations provided by the chain and bike manufacturers.
Some household products may be too aggressive for certain chain materials or seals.
Using products specifically intended for motorcycle chains is generally the safer option.
Noise may indicate:
Cleaning alone cannot solve mechanical wear.
Chain life varies depending on riding conditions, maintenance, riding style, and drivetrain quality.
Regular cleaning and proper lubrication can significantly extend its service life.
If both components show significant wear, replacing them as a matched set often provides the best long-term performance and helps prevent premature wear of the new parts.
Learning how to clean an electric dirt bike chain is one of the easiest ways to improve reliability, reduce drivetrain wear, and keep your bike performing at its best.
The process itself is straightforward:
Performed regularly, this simple routine helps protect both the chain and sprockets while maintaining smooth, efficient power delivery.
The best maintenance schedule isn’t based on the calendar—it’s based on your riding conditions. Mud, sand, rain, and heavy dust all require more frequent attention than dry trail riding.
A few minutes of maintenance after each ride can save hours of repairs and significantly extend the life of your drivetrain.
Best Electric Dirt Bike Accessories Buying an electric dirt bike is only the beginning of the riding experience. Whether you

Altis Sigma vs Sur Ron Ultra Bee The electric dirt bike market has entered a new stage. Today’s riders are
Altis Delta vs Talaria Sting MX5 The electric dirt bike market has changed dramatically in recent years. Riders now have
How to Transport an Electric Dirt Bike Whether you’re heading to a local trail, traveling to a race, or taking
